Organizations
An Organization is the top-level container in Wordiy that holds all your projects, team members, and billing information. It's the foundation of your translation management system, providing a centralized hub where your entire team collaborates on translating applications and content.
What is an Organization?
An organization serves as:
- A workspace for your team to collaborate on translations with integrated communication tools
- A billing entity that manages subscriptions, payments, and usage tracking
- A permission boundary where you control who can access what resources and perform which actions
- A resource container for all projects, team members, integrations, and settings
Think of an organization as your company or department's translation workspace. Within an organization, you can create multiple projects (one for each application, product, or content initiative), manage team members with different roles and permissions, and handle all billing and administrative tasks in one place.
Organizations are designed to scale from small teams working on a single project to large enterprises managing dozens of translation projects across multiple languages and geographies.
Organization Features
Team Management
Manage your entire translation team from a centralized location. With Wordiy's team management features, you can:
- Invite team members with specific roles and permissions
- Define access levels — Control who can create projects, manage teams, and make billing decisions
- Manage member permissions — Set granular permissions for each role (Owner, Manager, Translator, Reviewer, Viewer)
- Track team activity — View logs of who made changes, when translations were completed, and review submission history
- Organize by projects — Assign team members to specific projects or give them organization-wide access
- Role-based workflows — Enforce approval workflows where translators submit, reviewers approve, and managers export
Billing & Subscription
Handle all billing and subscription management in one place. Track your usage and make informed decisions about your translation workflow:
- Manage your subscription plan — Upgrade or downgrade your plan based on team size and project needs
- View detailed billing history — Access invoices, payment records, and transaction history
- Update payment methods — Securely manage credit cards and payment information
- Monitor usage and limits — Track how many team members, projects, and languages you're using
- Usage statistics — See real-time data on translations completed, strings processed, and API calls
- Pricing transparency — Understand exactly what you're paying for with clear pricing breakdowns
Project Management
Organize and manage multiple translation projects within your organization:
- Create and organize projects — Set up separate projects for each application, website, or product
- Control team access — Define which team members can access which projects
- Manage shared settings — Set organization-wide preferences that apply to all projects
- Archive or delete projects — Keep your workspace organized by archiving completed projects
- Project templates — Use pre-configured templates to quickly set up new projects with consistent settings
- Bulk operations — Import multiple projects, configure settings in bulk, and perform batch updates
Settings & Integrations
Configure your organization to work seamlessly with your development workflow:
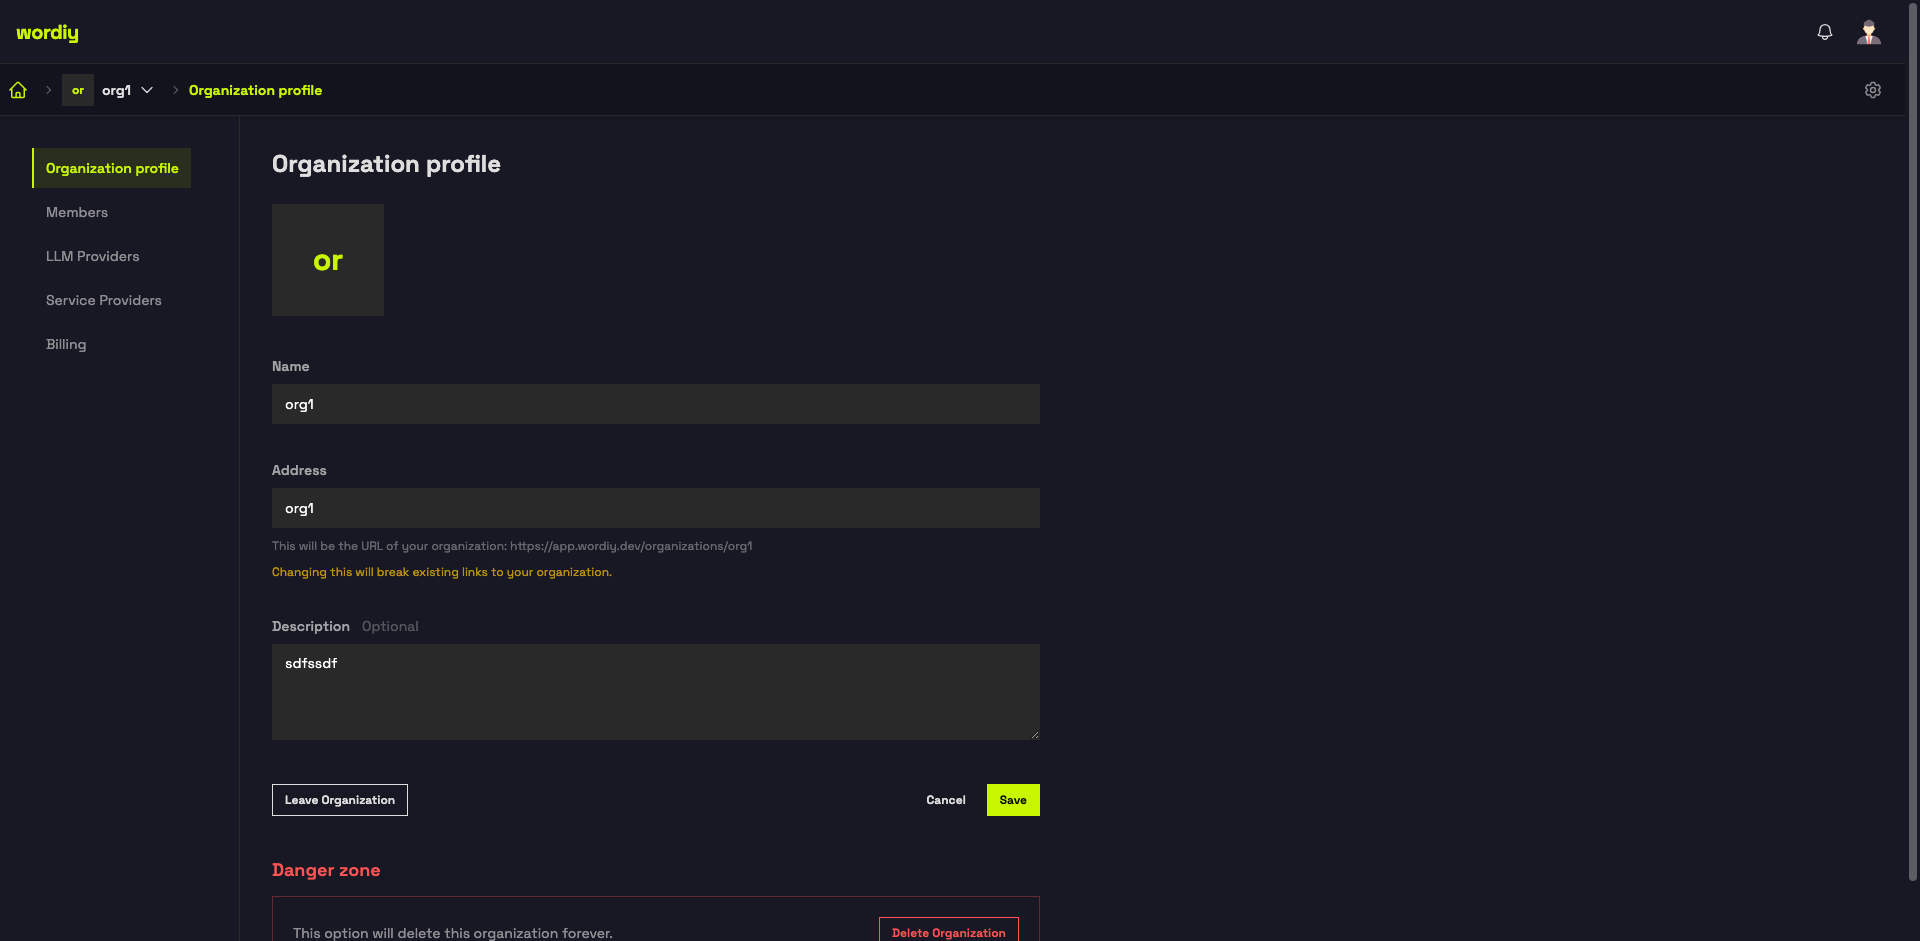
- Configure organization details — Set organization name, logo, website, and description
- Set up integrations — Connect with webhooks, APIs, and third-party services
- Manage API keys — Create and manage API keys for programmatic access to your translations
- Configure authentication — Set up SSO (Single Sign-On) for enterprise deployments
- Configure notification preferences — Control email alerts, Slack notifications, and other communication channels
- Branding & appearance — Customize colors, logos, and language for your team's interface
Organization Roles
Each team member in an organization has a role that determines their organization-level permissions. Additionally, team members can have different roles within individual projects (Translator, Reviewer, etc.).
Organization-Level Roles
Organization roles control who can manage the organization itself, its team, projects, and billing:
| Role | Access Level | Best For |
|---|---|---|
| Owner | Full organization control | Organization founders, administrators, decision makers |
| Admin | Manage team, projects, settings | Team leads, project managers |
| Member | Read-only access | Team members with limited responsibilities |
Detailed Organization Role Permissions
Owner — Complete organization control
- Manage team members (invite, remove, change roles)
- Create, edit, and delete projects
- Update organization settings
- Access and manage billing information
- Delete the organization
- Transfer organization ownership
- Full access to all projects and data
Admin — Team and project management (no billing)
- Manage team members (invite, remove, change roles)
- Create and manage projects
- Update organization settings
- View all projects and data
- Cannot: Manage billing, delete organization, or transfer ownership
Member — Limited access
- View assigned projects
- Access based on project-level roles
- Cannot: Manage organization settings, billing, or invite members
Project-Level Roles
Within each project, team members can be assigned specific roles that control what they can do with translations:
- Translator — Create and edit translations
- Reviewer — Review and approve translations
- Viewer — Read-only access to translations
These project-level roles are separate from organization roles and provide granular control over translation workflow.
Getting Started with Organizations
Dashboard - Organizations List
After logging in, you'll see your Organizations dashboard showing all organizations you're a member of:

This is where you can:
- View all organizations you belong to
- See organization details (projects, members, subscription status)
- Create a new organization
- Switch between organizations
Create an Organization
Setting up your first organization is simple and takes just a few minutes:
- Click "New Organization" — From the organizations dashboard, click the yellow "New Organization" button
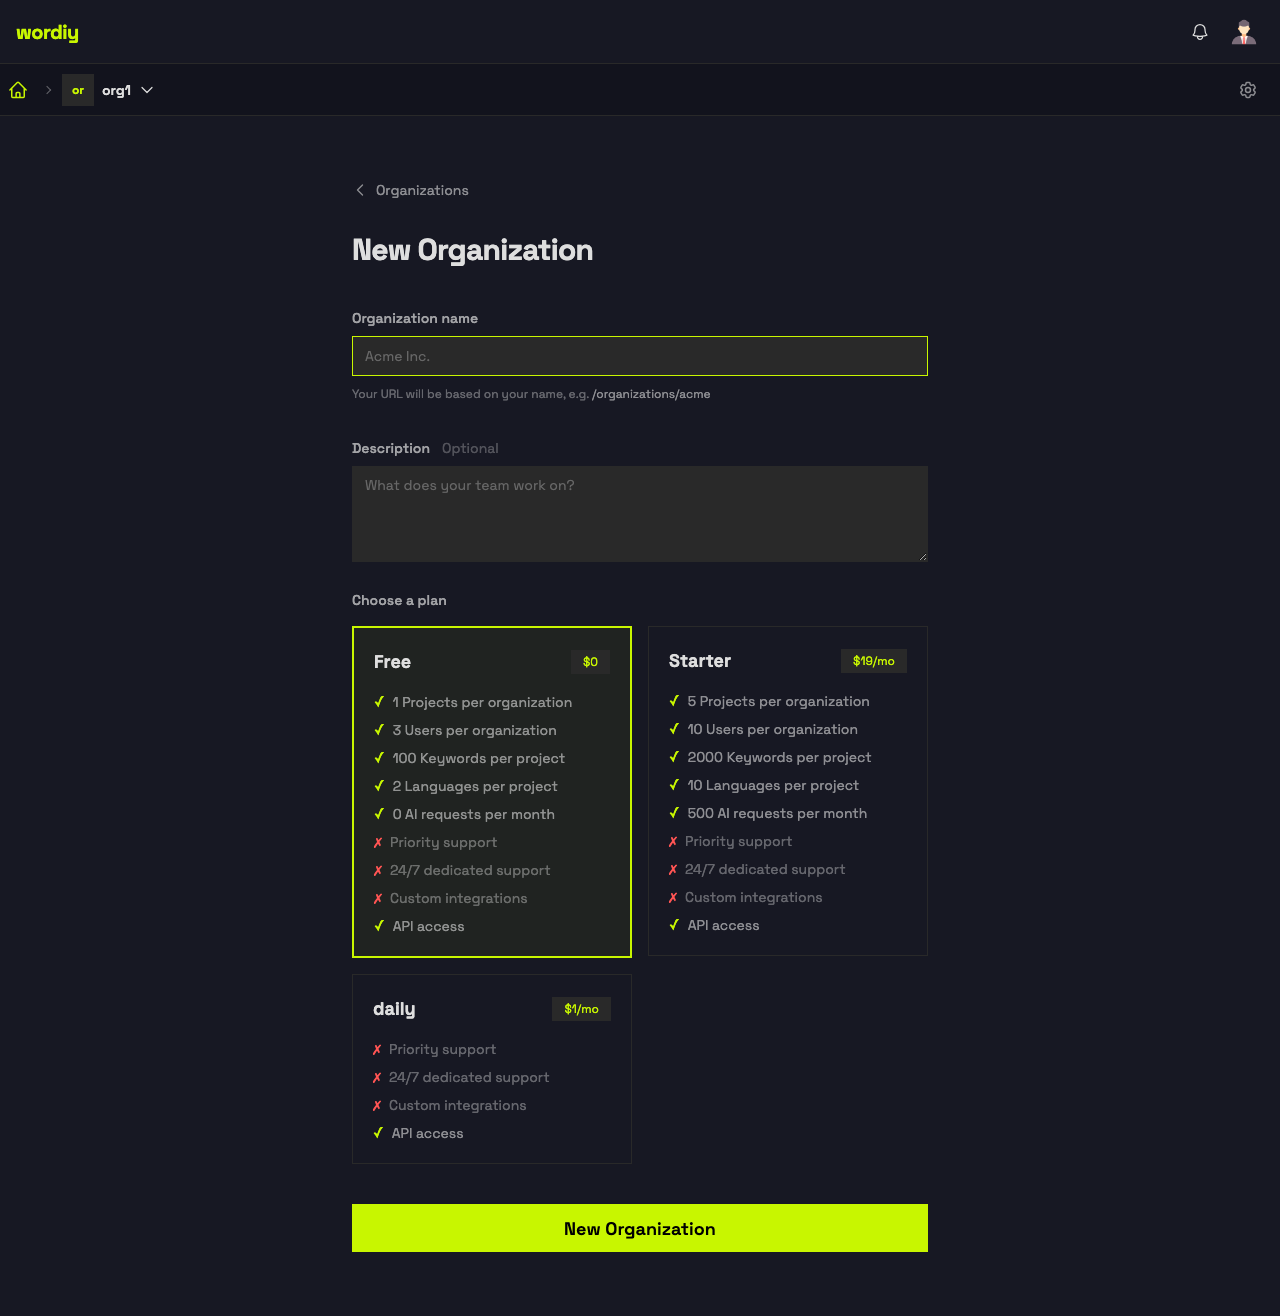
- Enter organization details — Provide your organization name and optional description
- Verify your email — Confirm your email address to activate the organization
- Configure basic settings — Add your logo, website, and language preferences
- Start inviting team members — Add translators, reviewers, and managers to your organization
Your organization is now ready! You're automatically set as the Owner with full permissions.
Invite Team Members
Building your translation team is straightforward:
Navigate to Organization Settings — From the dashboard, click your organization name at the top, then go to Settings → Members
The Members page shows your current team members and provides an "Invite Member" button to add new team members to your organization.
For detailed step-by-step instructions on inviting members, selecting roles, and managing your team, see the dedicated Invite Team Members guide.
Create Your First Project
Once your organization is set up, create a project to start translating:
- In your organization, click "New Project" — From the dashboard, select "Create Project"
- Enter project details — Provide project name, description, and choose your base language
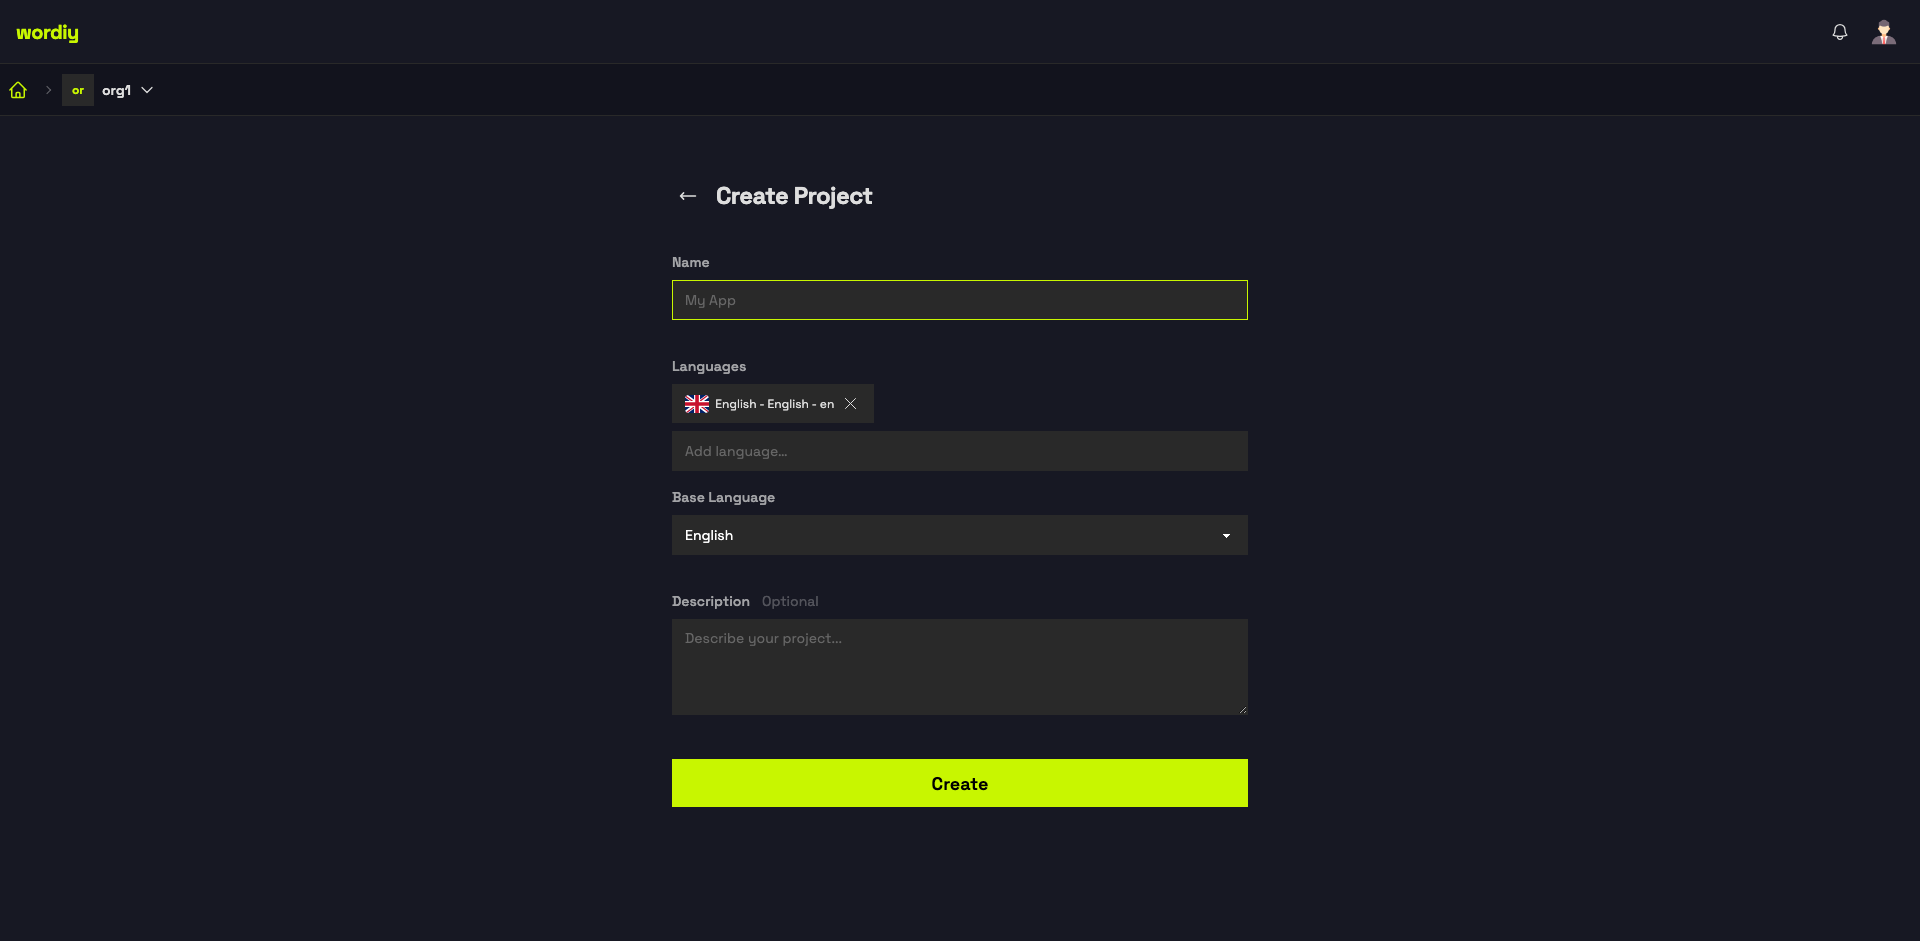
- Select base language — Choose the language your original strings are written in (usually English)
- Add additional languages — Select all target languages you want to translate into
- Configure project settings — Set character limits, enable placeholders, configure workflows
- Start uploading strings — Import your translatable strings from your application
Once your project is set up, invite team members to start translating and collaborating.
Organization Best Practices
Setting Up Your Organization
- Use clear, meaningful names — Choose descriptive organization names that reflect your company or department
- Add branding — Upload your logo and configure colors to match your brand
- Set up integrations early — Connect with your development tools, webhooks, and APIs from the start
- Configure notifications — Set up email and Slack notifications so your team stays informed
Managing Your Team
- Define clear roles — Assign appropriate roles based on job responsibilities and skill levels
- Principle of least privilege — Give team members only the permissions they need to do their job
- Regular role reviews — Quarterly, review team member roles and permissions to ensure they're still appropriate
- Document responsibilities — Create clear documentation about what each role can do and who should have that role
- Onboarding process — Develop a standard onboarding process for new team members
Managing Your Projects
- Organize by product/application — Create separate projects for each application or product you're translating
- Use consistent naming — Establish naming conventions for projects, languages, and strings
- Project templates — Create templates for common project types to speed up setup
- Archive completed projects — Keep your workspace clean by archiving projects that are no longer active
Monitoring and Optimization
- Regular backups — Export important projects regularly as a backup
- Monitor usage — Keep track of your subscription limits and team size
- Review analytics — Check translation progress, team velocity, and quality metrics
- Optimize workflows — Analyze your process and look for bottlenecks to improve efficiency
- Plan for growth — As your team grows, ensure your plan accommodates additional team members and projects
Security and Compliance
- Regular access reviews — Periodically verify that team members have appropriate access levels
- Audit trails — Review logs to see who made changes and when
- Change sensitive settings carefully — Be cautious when changing organization settings that affect the whole team
- Secure API keys — Protect API keys and don't share them unnecessarily
- Data privacy — Understand your data retention and privacy settings
Organization Limits
Your plan determines several limits:
- Maximum organizations — Number of organizations you can create (usually 1 for smaller plans)
- Projects per organization — How many projects you can have in each organization
- Team members — Maximum number of team members you can invite
- Storage — Total translation memory and project data storage
- API requests — Monthly API request limits for integrations
- Concurrent users — How many team members can work simultaneously
Check Billing & Pricing for your plan's specific limits.
Organization Structure Examples
Small Team Example
Organization: "Acme Corp"
├── Organization Roles:
│   ├── Owner (1)
│   └── Member (2-3)
└── Projects:
    └── Main Application
        ├── Project Roles:
        │   ├── Translator (2)
        │   └── Reviewer (1)
        └── Languages:
            ├── English (base)
            ├── Spanish
            ├── French
            └── German
Medium Team Example
Organization: "TechStartup Inc"
├── Organization Roles:
│   ├── Owner (1)
│   ├── Admin (1-2)
│   └── Member (8-12)
└── Projects:
    ├── Main Web App
    ├── Mobile App
    ├── Marketing Site
    └── Help Documentation
        ├── Each project has Translators and Reviewers
        └── Members assigned per project as needed
Enterprise Example
Organization: "Global Corporation"
├── Organization Roles:
│   ├── Owner (1-2)
│   ├── Admin (3-5) — One per major function
│   └── Member (40+)
└── Projects:
    ├── Product A
    ├── Product B
    ├── Product C
    ├── Websites (multiple)
    └── Marketing Content
        ├── Each project has Translators and Reviewers
        └── Members assigned to projects based on language/expertise